Main Dishes
Recipe| American Chop Suey
Step by Step: How to Make American Chop Suey
Step 1: Soak Pasta
Most recipes for American chop suey call for par-cooking macaroni in a separate pot until it’s nearly cooked through, then finishing it in the pan with the sauce. But for several years now, I’ve been using a technique that Aki Kamozawa and H. Alexander Talbot of Ideas in Food wrote about back in 2009: soaking pasta before cooking. The idea is to separate the two processes that happen when you’re cooking pasta: hydration and heat.
Once your pasta has soaked in warm water for about 20 minutes, it cooks up directly in the sauce in just under half the time it takes to boil it using the traditional method, and it means one fewer pot to heat up on the stovetop.
And before someone points it out, yes, I went fancy with the macaroni, ditching the elbows and using some ridged, spiral-shaped cavatappi instead.
Step 2: Chop Vegetables
American chop suey can contain ingredients as varied as celery to olives, but the vast majority of the time you get the classic Italian-American pepper and onion combo. The same stuff that’s served on top of your Fenway Frank or your Chicken Scarpariello. I use a mix of green bell peppers and yellow onion, though red bell pepper wouldn’t be completely out of the question here either.
Some folks like the pepper and onions cut into chunky strips. I prefer the way small dice melds into the sauce later on.
Step 3: Get Your Fat On
We’re cooking in a mixture of olive oil and butter here, for the same reason I do with my Italian-American Red Sauce: butter provides a velvety richness while olive oil gives great flavor.
Heat up the fats in a large, straight-sided sauté pan. As soon as the butter is melted, it’s time to move on.
Step 4: Sauté Your Veg
The trick here is to cook the vegetables down slowly so that they melt into the sauce without browning. Over moderate heat, it should take a full seven minutes. And remember—NO BROWNING. There’s a time and a place for sweet browned onion flavor, and it’s not here.
Step 5: Crush Tomatoes
I always keep my pantry stocked with whole peeled San Marzano tomatoes. Whole tomatoes in cans tend to be much more consistent in quality than diced or crushed tomatoes, and it’s a simple task to get them to whatever texture you’d like. If you have a stick blender, you can blend the tomatoes directly in the can they come in. If not, just buzz ’em in a normal blender for a few seconds. I’m using two full 28-ounce cans.
Step 6: Mince Garlic
Four cloves of garlic, minced however you normally mince it, whether that’s on a Microplane (like me), by hand (like the occasional me), or with a press (like not-me). While you’re at it, now is also a good time to roughly mince some fresh parsley leaves.
Step 7: Add Aromatics
Add the garlic along with a bit of red pepper flakes, a tablespoon of dried oregano, and a small handful of minced fresh parsley leaves. Why fresh parsley and dried oregano? Heartier herbs with more succulent leaves like oregano or rosemary retain their flavors far better when dried than tender leafy herbs like parsley. A good general rule of thumb is that if the leaves are fuzzy of pointy, they’ll still be tasty when dried. Thin and green? Use them fresh only.
Step 8: Here’s the Beef
No need to get fancy here. A pound of straight up 80/20 ground chuck has a good balance of flavor and fat. To cook it, I clear a space in the center of the pan and place the meat right in the center.
Step 9: Break Up the Meat
To break up the meat, I start by using a wooden spoon to get it into rough chunks.
Step 10: Mash It
Then I follow through with a potato masher to completely separate the meat into small bits (a sturdy whisk will also work). I like the way this helps the meat incorporate evenly into the sauce—there’s nothing I dislike more than large chunks of tough meat in an otherwise smooth sauce.
Ok, I can think of a few things I hate more,* but not many.
*bananas, the Eagles, and microwaves with too many buttons come to mind.
To that end, I also don’t like to brown my ground meat too deeply—the more you brown, the tougher and grittier it gets. Even without browning, there’s plenty of flavor going on here, and I prefer the more velvety texture of meat that’s mostly simmered.
There are exceptions to this rule, and when I do brown ground meat, I’ll generally buy the meat as whole pieces, brown it first, then cut and grind it to get browned flavor without introducing toughness. But that’s too much work for an easy project like this.
Step 11: Add the Tomatoes
Both cans of puréed tomatoes are stirred into the sauté pan.
Step 12: Drain the Pasta
At this point, your pasta should have been soaking in hot water for around 20 to 30 minutes. It’s not 100% hydrated, but it’s got a good head start. Drain it in a colander.
Step 13: Add the Pasta
Next, add the pasta to the sauté pan. It’ll finishing cooking right in the sauce.
Step 14: Add the Worcestershire
Worcestershire sauce is an essential element in New England-style American chop suey. I glug it in by eye, but you can start with two tablespoons for the whole pot if you’re the type that gets uncomfortable when there are no measuring spoons around.
Step 15: Add Chicken Broth
Since we’re still gonna have to partially re-hydrate those noodles, a little bit of extra liquid is necessary. I add a cup of chicken broth to the mix before seasoning it with salt and pepper.
Step 16: Stir, Simmer, and Cook
Stir everything together, cover it with a lid, and let it sit at a hard simmer for about five minutes to get the noodles to cook nearly all the way through.
Step 17: Cut the Cheese
While the sauce simmers, it’s time to work on the cheese.
The most basic American chop suey recipes are made 100% cheese-free, but I don’t stand for that kind of nonsense here.
I tried making this casserole topped a few different ways: grated Parmesan, grated mozzarella, cubed mozzarella—I even went to the extremes, using white American singles (not uncommon!) to real honest-to-goodness, straight-from-Italy buffalo milk mozzarella. (The American has great texture but it melts almost too easily, and fails to add much flavor to the dish. Very fresh water-packed mozzarellas tended to get rubbery when melted and release too much watery whey.)
While the standard dish is light on the cheese, every time I added more cheese it just got better and better. I decided to say screw it to tradition in favor of better flavor. The best cheese for the job was plain old low-moisture mozzarella cheese from the supermarket. Pizza cheese, if you will.
Rather than applying it in grated form, I found cubes was better, giving you nice cheesy pockets to bite into.
We’re using a full pound of mozzarella cheese here.
Step 18: Grate Parmesan
In addition to the mozzarella, I grate down a few ounces of Parmigiano-Reggiano. Perhaps Italy’s most famous cheese seems a little out of place in one of America’s lowliest casseroles, but there’s a reason opposites attract, and in this case, that reason is that both things are damned delicious.
Step 19: Uncover and Stir
After simmering for five minutes, remove the cover and stir the pasta, tasting a piece to ensure that it’s cooked. At this point it’ll still look very soupy and moist. This is okay. It will tighten up. Just trust me on this one.
Step 20: Stir In and Top With Cheese
Most American chop suey recipes add a sprinkling of cheese to the top of the dish. To me that seems a little half-assed when comforting is what we’re going for. Instead, I take half of the cheese and stir it right into the casserole, folding gently so that the cheese remains in intact pockets that build cheesy flavor and richness into every bite.
Spread the remaining mozzarella over the top of the casserole along with half of the Parmesan.
Step 21: Cover and Cook
Cover the pan again, bring it to a light simmer for three minutes, then let it rest off heat for five minutes for the cheese to melt thoroughly.
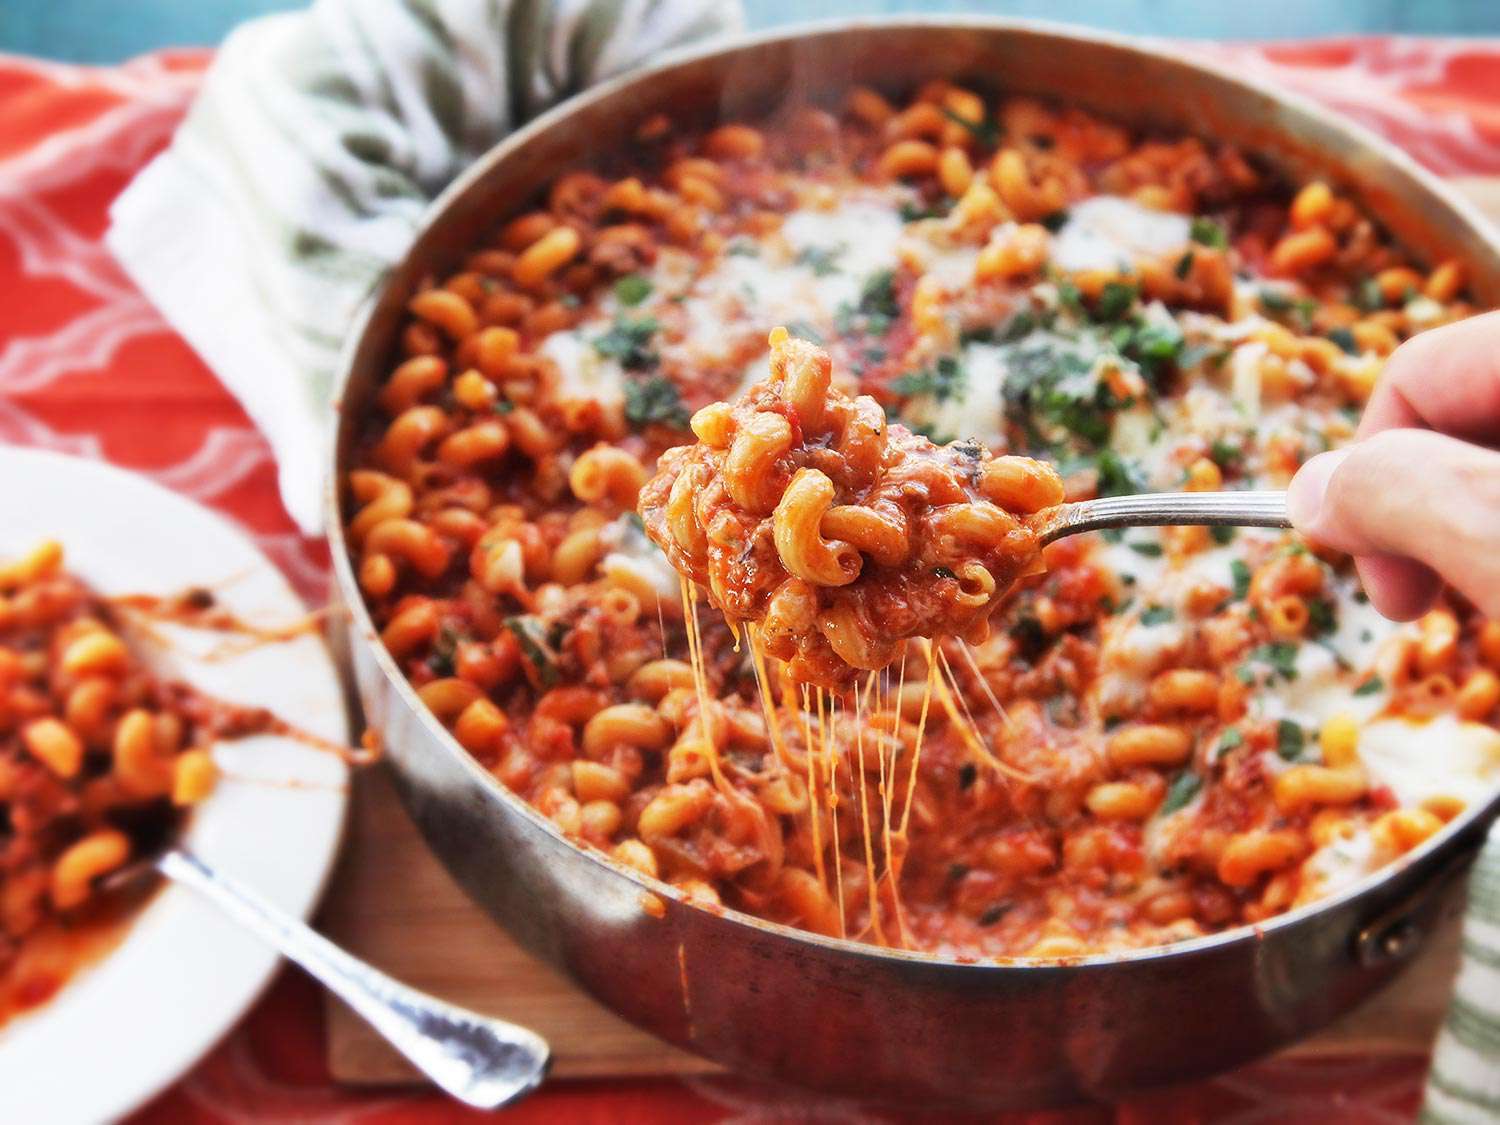
Step 22: The Reveal
After that final rest, your pasta should have absorbed the last traces of excess liquid while becoming perfectly al dente in the process. The cheese should be fully melted, and everything should smell insanely delicious. As soon as the lid is off, I sprinkle it with a bit of extra grated Parmesan, along with some roughly chopped parsley leaves. Adding those herbs in two stages helps build up layers of flavor.
Are your guests a little slow getting to the dinner table? Don’t worry about it. This is the kind of dense, heavy stuff that will stay steaming hot and gooey for at least half an hour. Still, if you want to get that perfect cheese-tendril money shot, your best bet is to act fast.
See how that cheese gets itself nice and comfortable between the noodles? That’s how comfortable you’re gonna be once you start eating. (Pass the Worcestershire and the hot sauce, please.)
If this dish doesn’t inspire groans in your stomach, intense pangs of hunger, and furrowed brows deeply troubled by a sense of longing and incompleteness in you, then I’m afraid that you and I may just not get along.

American Chop Suey